In this (fairly long winded) article. I’ll go over the process, from start to end, which led me to writing the ease-copy script for Davinci Fusion.
Intro
Over the years, I switched my software for making visuals three times: I have used After Effects from 2017 to 2022, Davinci Resolve from mid 2022 to late 2023, and finally switched to Autograph, which I’ve been using ever since.
In this article, we’ll look at how it’s like to write scripts for Davinci Resolve, and we’ll use one of the script I wrote, an ease-copy script, as an example.
Fusion is a software initially developed by eyeon, it was later purchased by the software and hardware company Blackmagic, who wanted to have a compositor for their software, Davinci Resolve.
Table of contents
- Intro
- Table of contents
- DL link and instructions
- Should you use Fusion to make visuals?
- Fusion and easing, why make an ease-copy script in the first place?
- How to make an ease-copy script? Laying down the fundamentals
- A primer on LUA
- A primer on Fusion Scripting
- Making the ease-copy script
- Conclusion
DL link and instructions
You may download the script here.
Here is a video by PeeJ ENT on how to install and use the script.
Should you use Fusion to make visuals?
As I said before, I have used Davinci Resolve to do visuals for about two years now, during that time, I made four videos with it:
- My Super Hidamatsuri part;
- This video was the very first video I did with Resolve, but still the best of the bunch;
- My Toshinose 2022 part;
- MZ&K;
- Tokyo Shandy Rendez Vous
- I wrote about this part in another article
With these four projects, I’ve gotten fairly used to using Fusion for my visuals, and this is something I can confidently say about it: Fusion is not a friendly software.
My biggest complaint about it is that the UX is fairly unpolished, Fusion is, first-and-foremost, a compositor. You don’t simply use Fusion for Motion Graphics, you wrangle Fusion into doing motion graphics. To name a few issues that you will encounter from the first hours of using it:
- Audio in Fusion is clunky;
- You must get your audio from the resolve timeline using an empty MediaIn node that you don’t connect to anything;
- You need to understand how to properly cache your audio playback, and do so every time you open your project;
- Pausing/stopping playback will pause in place, there is no preference to wrap back to the your playback starting point even though other Resolve tabs have it.
This is to name just a few of its immediate shortcomings, which for certain users, might be unpleasant enough to immediately jump back to After Effects. Thankfully, I was undeterred, as I really, really did not want to go back.
But while the UX can be miserable at times, Resolve actually gives you the tools to make your life easier, that is when scripting comes into play!
Fusion comes with a handy scripting console that lets you test out commands on-the-go. Over time, I have made a few scripts such as:
- BPM navigation;
- One scripts lets you set the BPM, while other scripts use the saved BPM info to navigate by beat/measure;
- Playback improvements;
- Instead of using space to preview, I set another shortcut that links to a script, which saves the starting point of my playback, and goes back to it once I press the shortcut again;
- Multi-frame navigation;
- A very simple set of script that lets me move 10s of frames at a time;
- An ease-copy script (this is the one we’re going to talk about today).
So, would I recommend using Fusion for your visuals? I think it’s a software worth using, it generally works and outranks After Effects in multiple areas, but you’ll have to be willing to fix its shortcomings by yourself.
Fusion and easing, why make an ease-copy script in the first place?
What is “easing”
First of all, easing (in video editing) is the process that lets you make a movement smoother/faster/snappier/bouncy/etc… An easing function is applied to a value to define how it evolves from one “keyframe” (a point in time defining a property’s value) to the next. You can see an example of different easing functions here.
All advanced editing software provides the user with a “graph editor”, allowing you to define a custom curve by yourself using handles:

Here, you can see me setting a custom easing curve for the “size” parameter on the left pane.
Easing is a fundamental part of motion graphics, so much so that most editing software either gives you a quick access to easing functions from a simple keyBind (Blender for example), or via a third party script (After Effects with the “Flow” extension… yes, after effects is the leading motion graphics software and it has no built-in easing helper).
I said “most” software, and herein lies the issue with Davinci Fusion.
Easing in Davinci Fusion is pretty terrible
The lack of polish when it comes to keyframes and easing is by far my biggest gripe with Fusion:
First of all: keyframes are tiny and very hard to select.

While Fusion does offer an “easing” dialog, it is also a very underwhelming one.
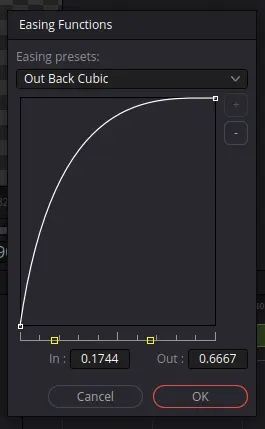
- The menu has no state, every time you apply an ease, no value changes are saved;
- You cannot add custom eases to it, only a few predefined ones are available;
- There is no shortcut key to open this menu;
- The menu is only accessible via the “spline/graph editor” tab, and is hidden deep inside a contextual submenu, meaning that it is almost always faster to use the already-open graph editor instead of bothering to fetch the ease menu.
It is something I brought up in the official Blackmagic (the company behind Davinci Resolve) forums, but to no avail.
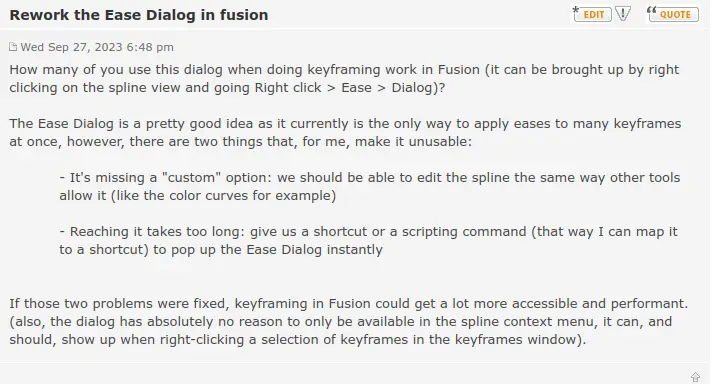
Since easing was not going to get better any time soon, I decided to see if I could fix it on my own with a bit of scripting. That is when I started working on my ease-copy script.
How to make an ease-copy script? Laying down the fundamentals
Before I got to scripting, I had to figure out what exactly I was trying to do. I wanted a script that would be able to:
- Save keyframe easing curves as presets;
- Apply those presets to any other set of keyframes;
- Delete presets.
I had to make something better than what Blackmagic provided, so I had to take quality of life into account:
- The script must keep in memory custom configurations even after closing the script panel/window;
- The script window must be small and compact enough so that it can stay open and sit on one side of the screen without obstructing other parts of the software, it needs to be a handy floating panel;
- The script should make it obvious as for what keyframes are being targeted by the save/apply operations.
With all of that in mind, I had a clearer vision of what I needed to do. But before we get to the script itself, you might first have to learn a bit about Fusion’s main scripting language, LUA.
A primer on LUA
This part is mostly just a retelling of LUA’s documentation. You may skip to the next part if you already know LUA, or if you have enough programming know-how to figure it out from the later code examples.
LUA is the scripting language that is used by Fusion, either that or python, but LUA is built-in, requiring no additional installation or configuration.
It’s fairly basic in its capabilities and data structures, the standard library is more limited than other scripting languages, but it makes up for it in efficiency.
Types
Lua has all the classic types:
- string
- number
- function
- boolean
- nil (this one represents undefined in javascript)
The type() method easily lets you check what is of what type.
Here is an extract from the official documentation.
    print(type("Hello world"))  --> string
    print(type(10.4*3))         --> number
    print(type(print))          --> function
    print(type(type))           --> function
    print(type(true))           --> boolean
    print(type(nil))            --> nil
    print(type(type(X)))        --> string
Variables
Variables are not strongly typed, you can (at your own risk) reassign a value of another type to a variable containing a value of a certain type.
Local variables are defined by appending the local prefix to the definition, otherwise it’s global. Locality works as you would expect with some basic knowledge of blocks and chunks (just like let in javascript). LUA has no “constant” prefix.
nil is not null, nil is inexistence, if you want to destroy a global variable, you assign nil to it.
Tables
LUA tables are the be-all and end-all of data structures, there is no other construct. Arrays, matrices, dictionaries, all can be implemented with a table.
An array can be made with the shorthand constructor:
array = {1, 4, 9, 16, 25, 36, 49, 64, 81}

print(array[1]) --> 1
The table constructor initializes arrays at 1, not 0. Lua recommends indexing at 1
Indices are automatically created for each value, a more customized key-value correspondance is obtained by defining the keys:
table = {5,8,2}

print(table[1]) --> 5

table = {test = 5,8,2} -- You can mix indices definitions

print(table[1]) --> 8
print(table["test"]) --> 5
Iterating over a table with pairs does it in an arbitrary order, ordered iteration requires an array (ordered indices starting at 1) and the use of the ipairs() function. More info can be obtained here (you probably should read the entire thing if you want to get serious about lua scripting).
The standard library
LUA’s standard library is smaller than average, implementing basic functions and math, but not much more, you’ll probably be copy-pasting helpers from online if you want to do more complex scripting.
This much should be enough LUA knowledge to start experimenting with it inside of Davinci Fusion
Classes and methods
In LUA, an object instances’ method is often invoked using : instead of .. This is because in OOP, the instance itself should be passed to a method if we want to only affect the instance’s lifecycle, : does that under the hood (more details here).
myObject:callMethod()
myObject.callMethod(myObject) --same thing
A primer on Fusion Scripting
Once you’re in a new Fusion composition, you can bring up the scripting console with Workspace > console from the top menu.
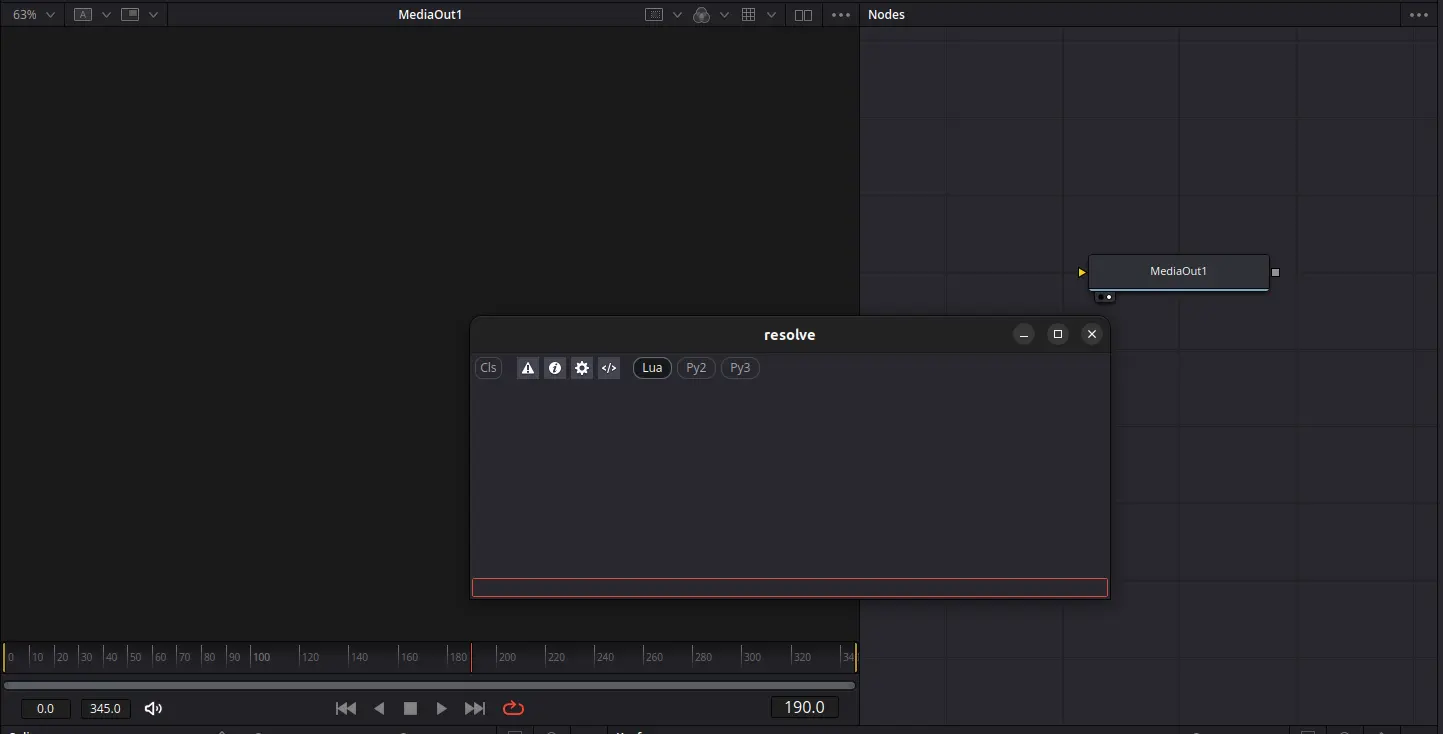
It’s configured to use LUA by default.
The scripting manual
Fusion’s scripting console does not have any kind of intellisense or autocomplete, there is no VSCode extension either if you want to write scripts externally.
The most important piece of documentation you have is a two-hundred-pages-long scripting manual. This manual teaches the fundamentals of Fusion’s Object Model and available scripting methods/properties. I had to read through a big portion of it to get my bearings and understand how to navigate around objects and properties.
Printing to the console
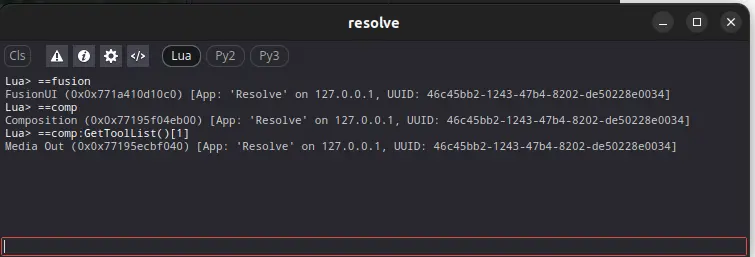
Because the Fusion scripting environment has a lot of tables, the fusion console comes with a handy helper, the dump() function, this can be simplified even more with the == shorthand if the command is a single-line expression.
dump(comp:GetToolList())
-- table: 0x771a1d281eb8
-- 	1 = Media Out (0x0x77195ecbf040) [App: 'Resolve' on 127.0.0.1, UUID:46c45bb2-1243-47b4-8202-de50228e0034]
==comp:GetToolList()
-- table: 0x771a1d2822b8
-- 	1 = Media Out (0x0x77195ecbf040) [App: 'Resolve' on 127.0.0.1, UUID: 46c45bb2-1243-47b4-8202-de50228e0034]
This is useful for debugging (or should I say, this is one of your only debugging tools).
The Fusion Object Model
Knowing how to navigate the Object Model is crucial to scripting in fusion. A few global variables are made available to you from the get-go:
| Object | Description |
|---|---|
| FusionUI | Fusion represents the Fusion application state, accessible via fusion |
| Composition | The current active composition in the script’s execution context, accessible via comp or fusion:GetCurrentComp() |
| Tool/Operator | Represents a node in fusion’s node editor |
| MainInput/MainOutput | Inputs and outputs that appear as connections between nodes on the Flow |
| Input | Properties that can appear on a tool’s properties view, can be a controlled input or a modifier |
| Output | An output is the final value of a tool’s property |
Understanding the object model with a practical example
Let us start with a blank composition.
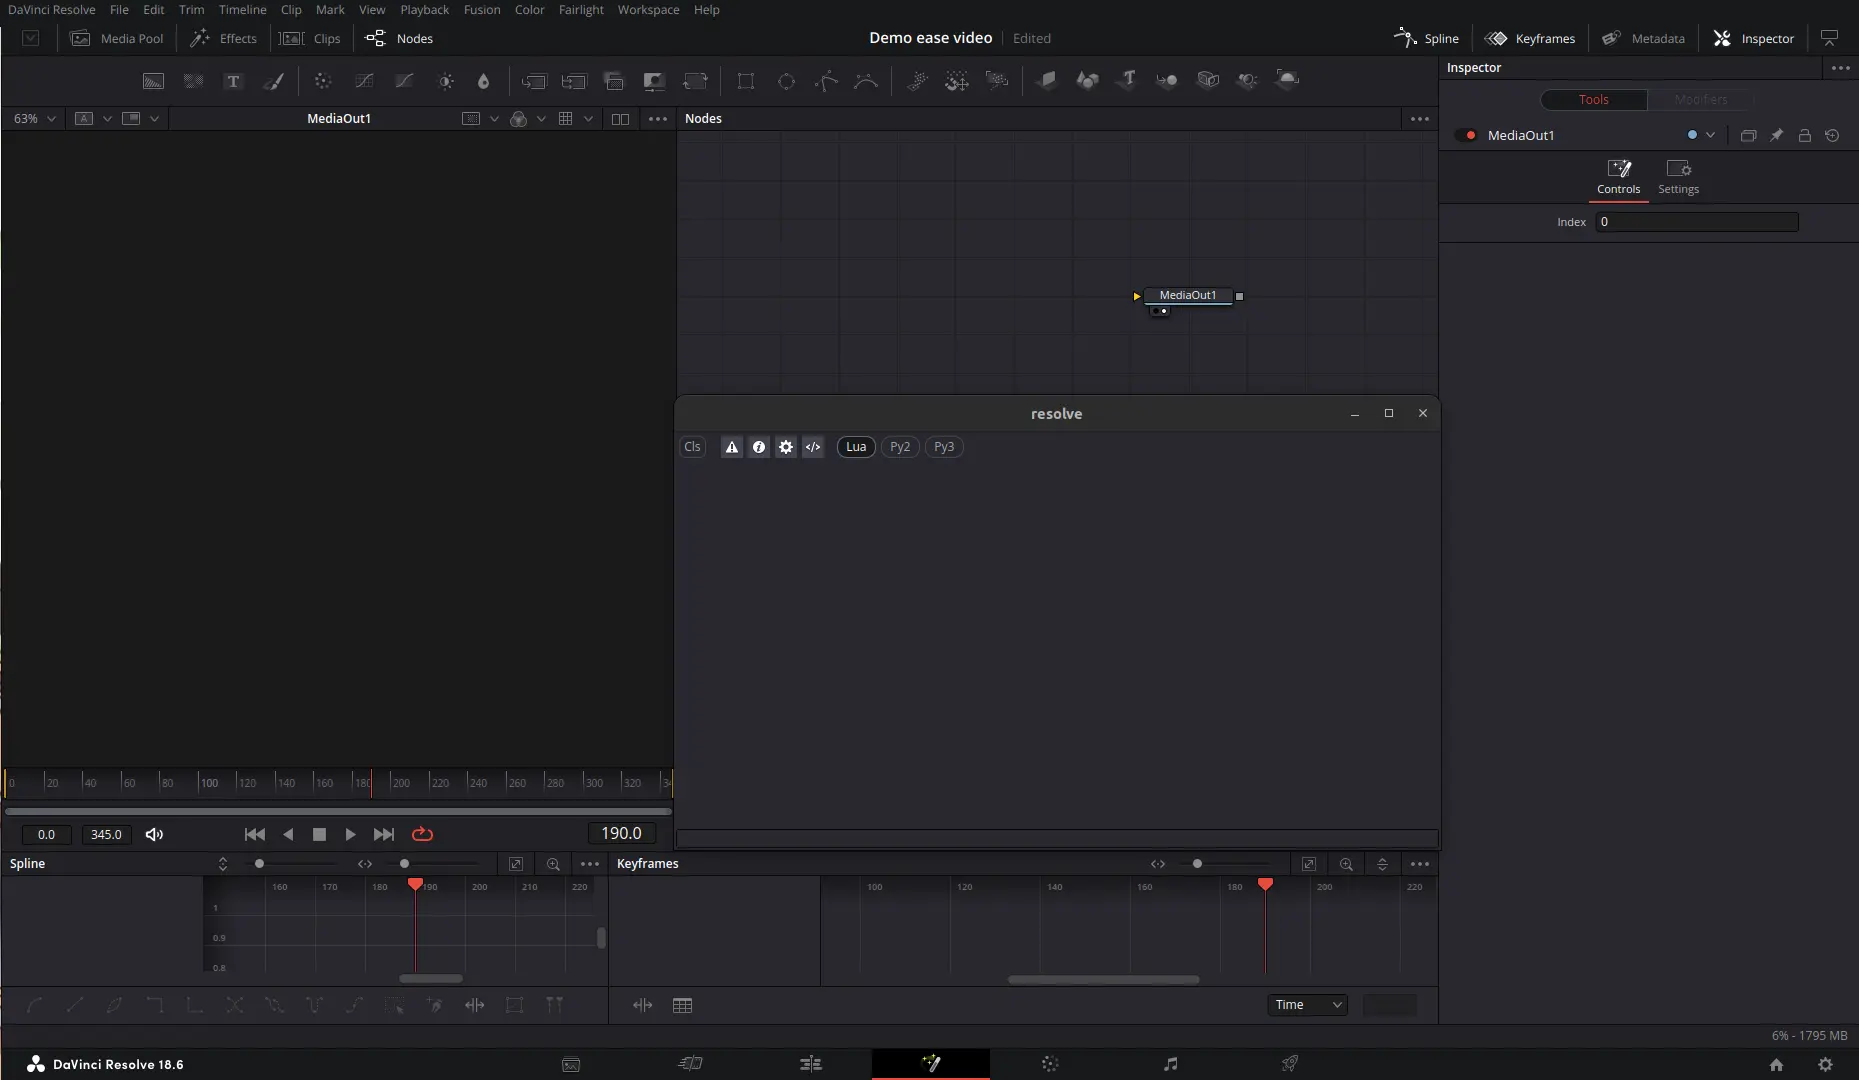
Let’s say our goal there is to create a solid background and change its color from blue to green over the course of one second, but we can only do it using the console.
Creating a node
First, create the tool with the AddTool() method.
comp:AddTool("Background")
By convention, you can expect all class methods and attributes to use CamelCase.
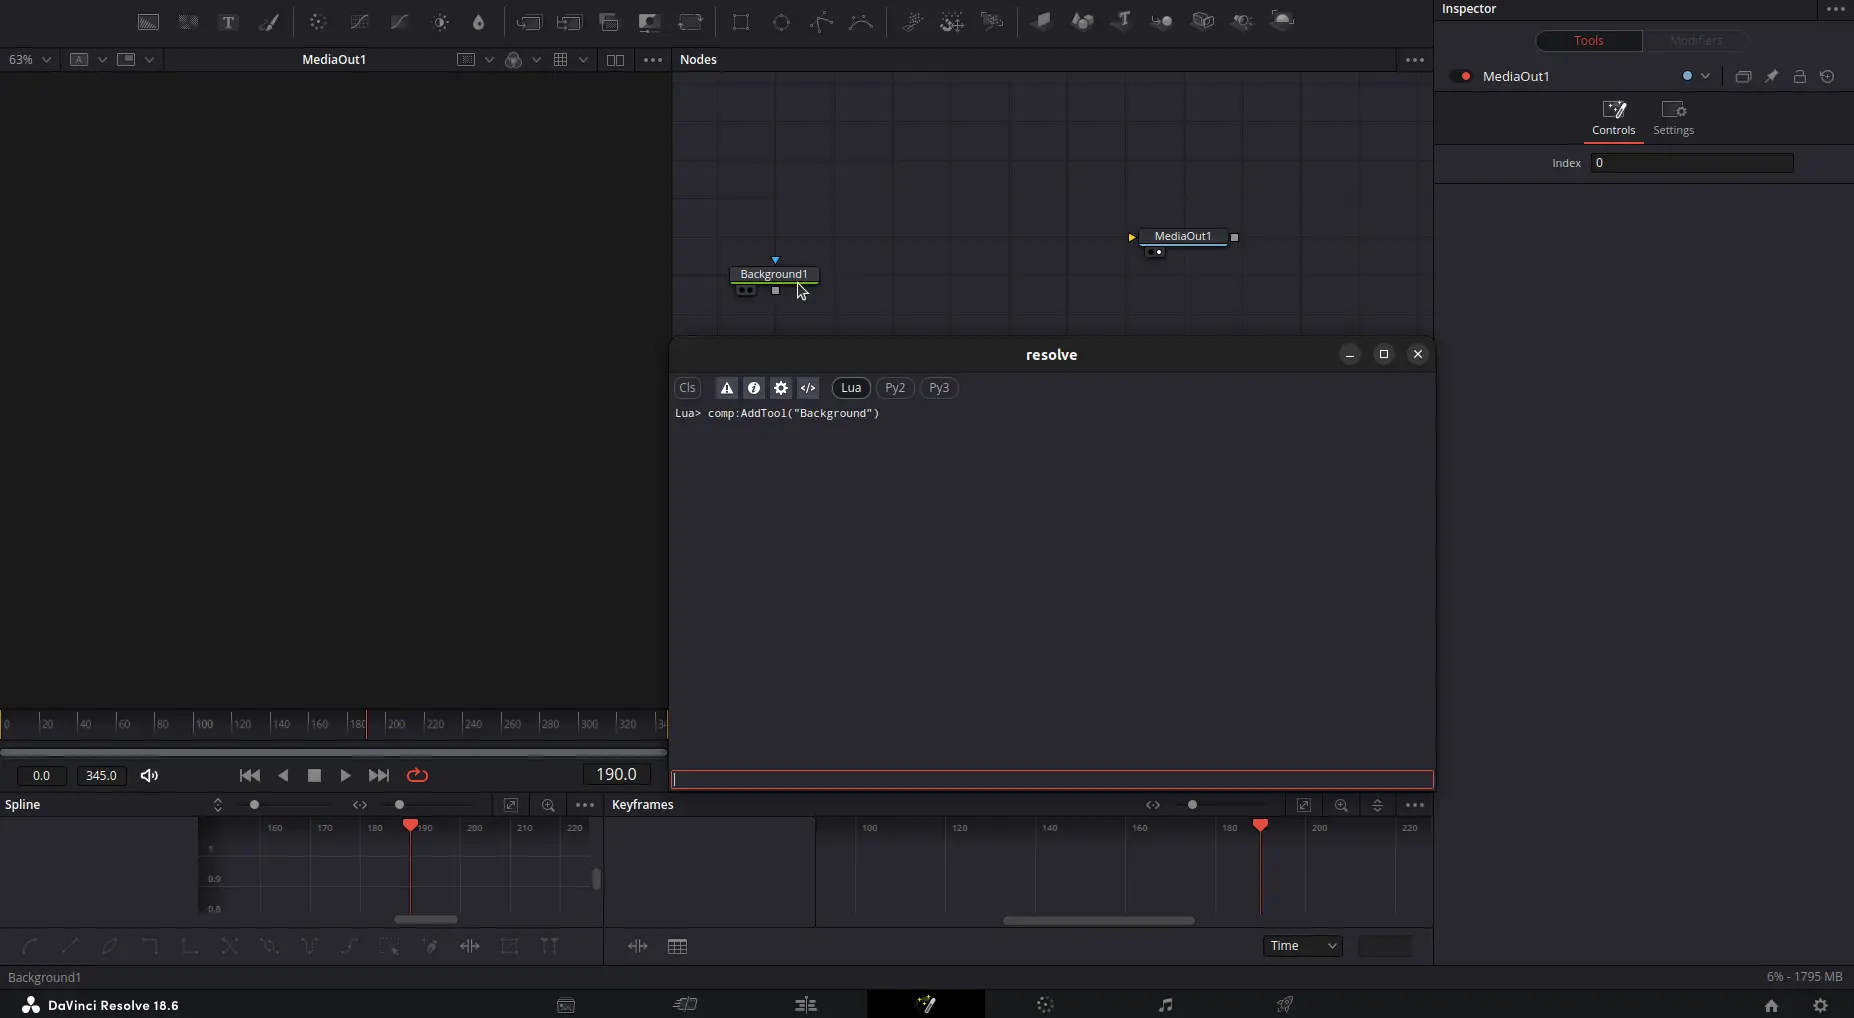
Hovering on the newly created node, you can see its name in the bottom left corner, this name can be used to globally access the node.
==Background1
-- Background (0x0x77195d739600) [App: 'Resolve' on 127.0.0.1, UUID: 46c45bb2-1243-47b4-8202-de50228e0034]
Connecting inputs and outputs
Then, we need to connect our Background1 node to our MediaOut1 node, this operation is done from the input of the receiving node (MediaOut1, that is). It is not our input that is connecting to the output (like you would usually do with your mouse by dragging from source to target), but rather, our output that is requesting the input.
input = Mediaout1:FindMainInput(1)
bgOutput = Background1:FindMainOutput(1)
input:ConnectTo(bgOutput)
With this, the background is now connected to the output, and displayed as a solid black color in the preview window!
Changing properties (no keyframes)
Now to change the color from black to blue.
Click on the background node to show its properties in the inspector.
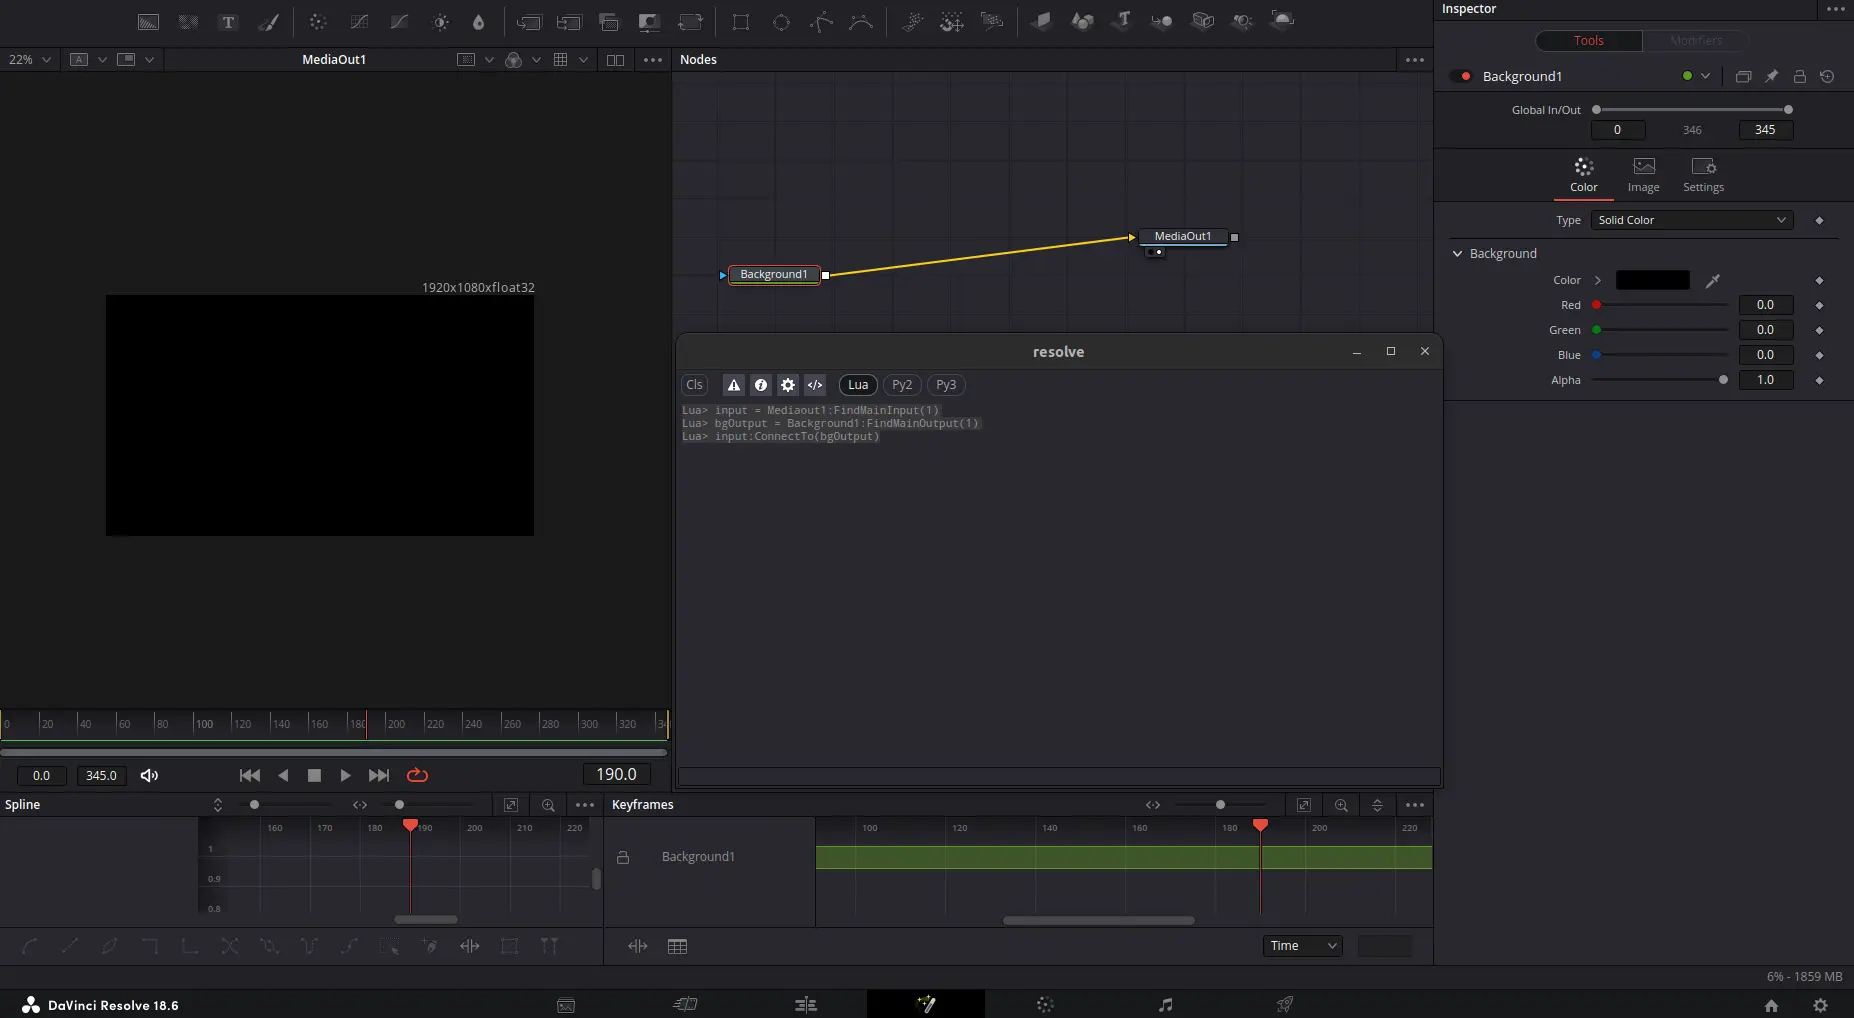
The same “hover” trick can also be used on properties name in order to show the name of input parameters.
If you hover over the “Color” property, you will see that nothing shows up on the bottom left corner.
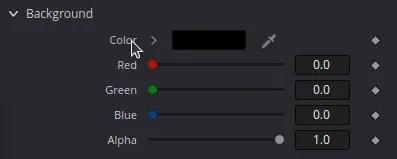
The reason behind this is that “Color” is not a property that actually exists on the background node, but rather, it is a user control that is linked to the Red, Green, Blue, and Alpha values just below it.
Once you hover over “Blue”, you will see its real name show up on the bottom left.
Background1.TopLeftBlue
Now why the TopLeft prefix? That is because background nodes can also be set to be 4-color-gradients, and when they are set to the Solid Color type, then it is the top-left corner that is used.
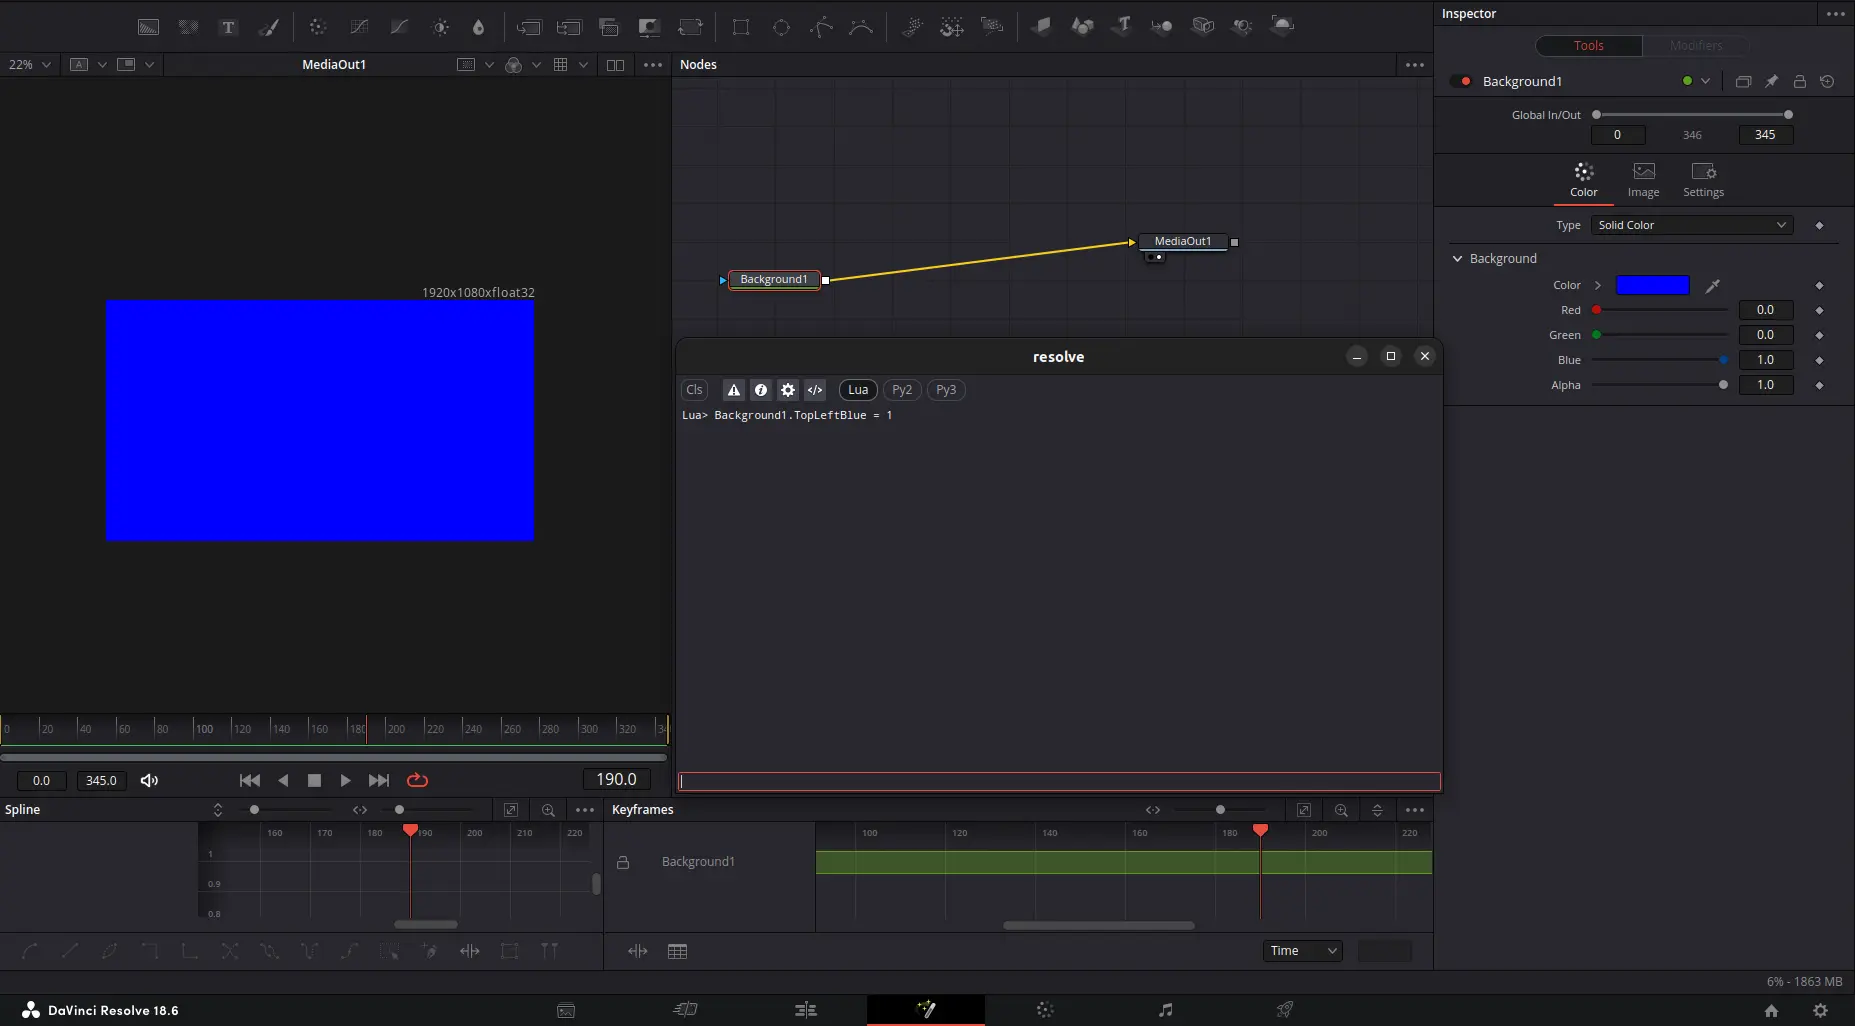
You can make the background blue by setting the new value of the Blue property to 1 (color values are normalized, they don’t use the 0-255 range)
Background1.TopLeftBlue = 1
Animating an input
We now need to animate the background from blue to green, that means, animating blue from 1 to 0 and inversely for green.
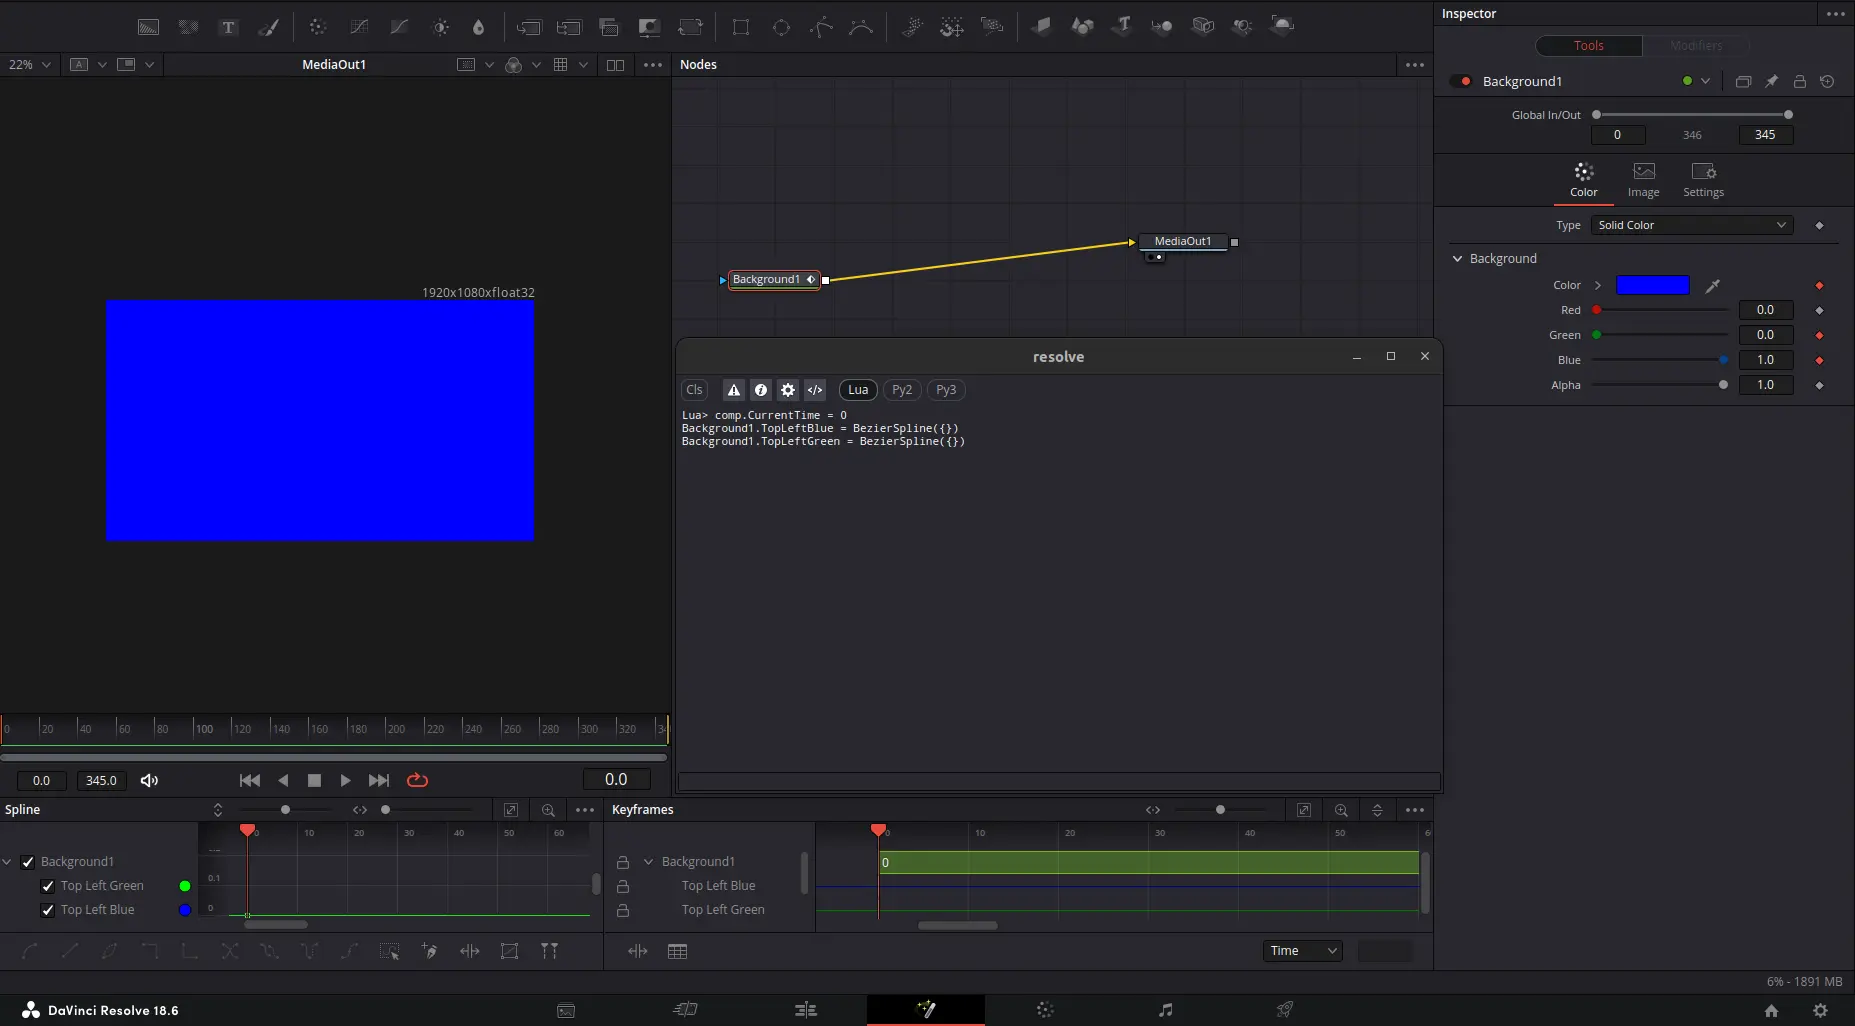
To animate an input, a BezierSpline must be passed to the input’s value. When you do this, a keyframe is created at the current composition time, so we will se our composition’s CurrentTime value to the frame 0. We can then create the BezierSpline
comp.CurrentTime = 0
Background1.TopLeftBlue = BezierSpline({})
Background1.TopLeftGreen = BezierSpline({})
Now, it is simply a matter of changing the values after one second, when a property is animated, you can create a new keyframe by setting a new value at a certain time using the frame as an index of the property, if your composition is 30fps, then frame 30 is at one second in the composition:
Background1.TopLeftBlue[30] = 0
Background1.TopLeftGreen[30] = 1
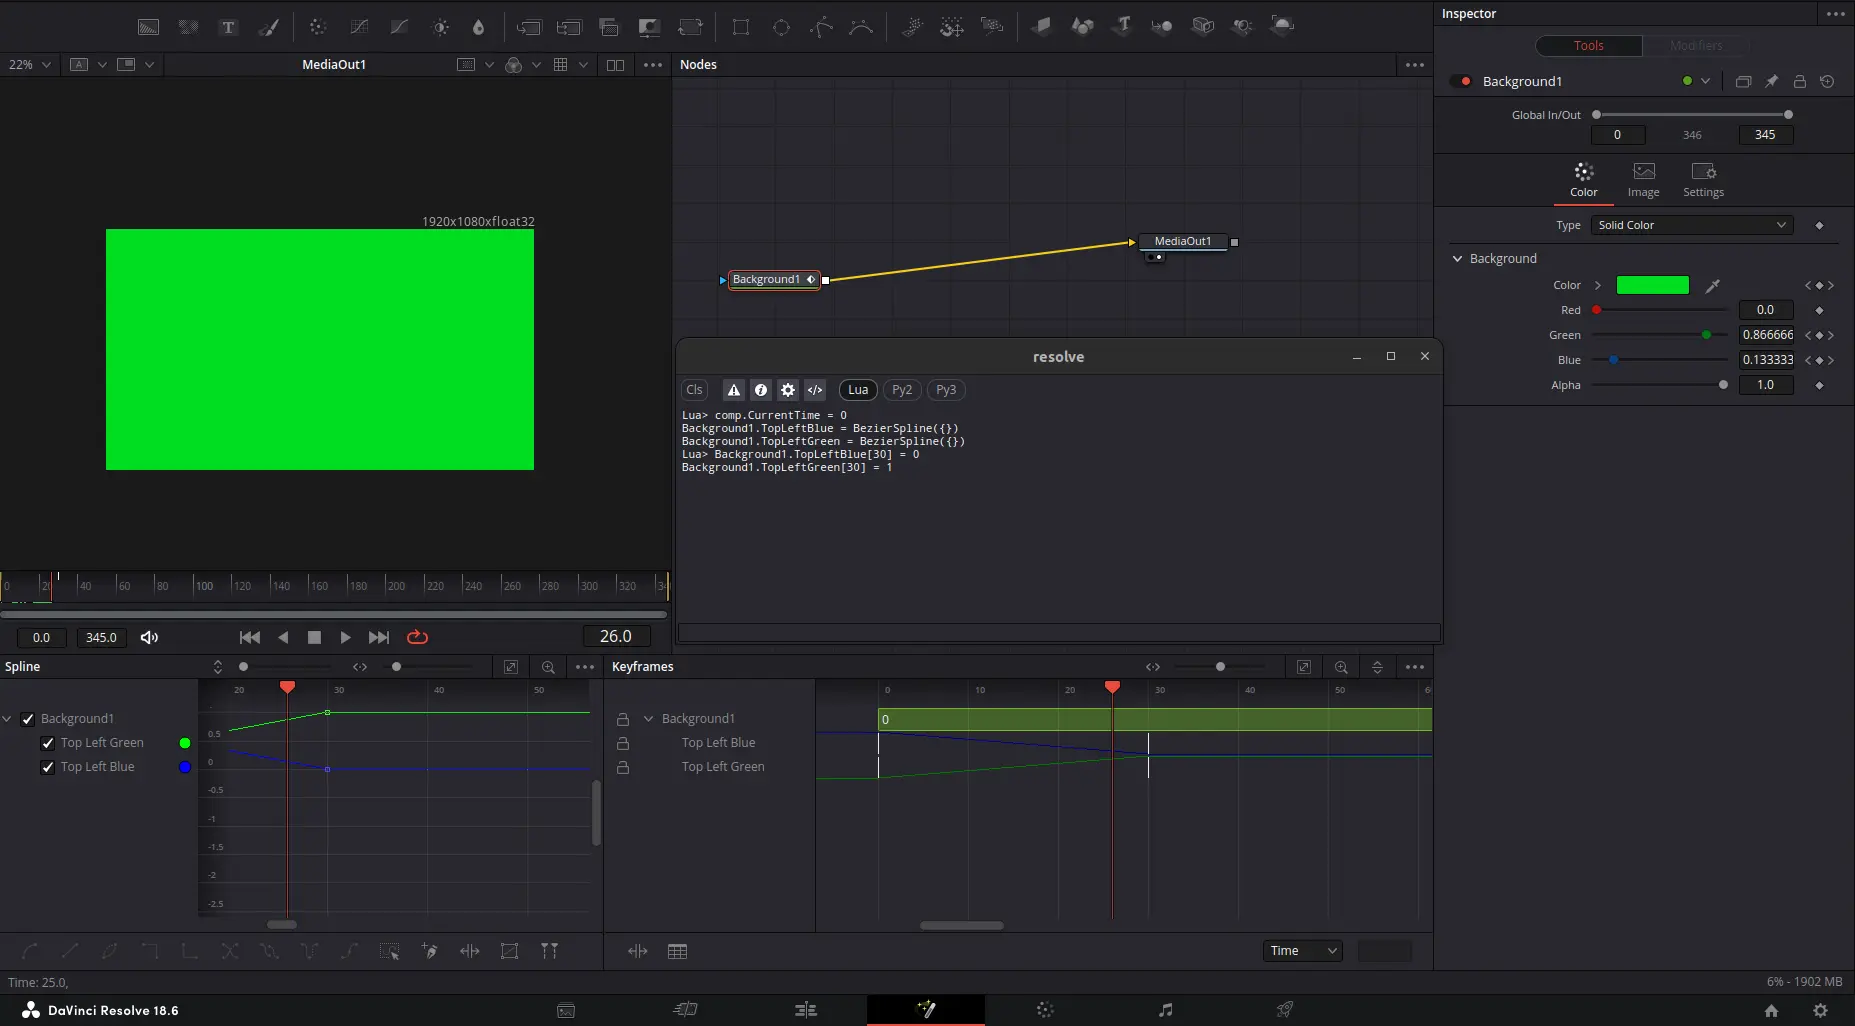
And there it is! We have now animated a color change using only scripts.
(as a bonus, you can use comp:Play() and comp:Stop() to play the animation).
This should give you a general idea of how you can use Fusion scripts for miscellaneous simple tasks.
Putting it all together
This block of text can be copy-pasted in the console to achieve everything we’ve discussed in this demonstration.
comp:AddTool("Background")
input = Mediaout1:FindMainInput(1)
bgOutput = Background1:FindMainOutput(1)
input:ConnectTo(bgOutput)
Background1.TopLeftBlue = 1
comp.CurrentTime = 0
Background1.TopLeftBlue = BezierSpline({})
Background1.TopLeftGreen = BezierSpline({})
Background1.TopLeftBlue[30] = 0
Background1.TopLeftGreen[30] = 1
Making the ease-copy script
Now that you have a basic idea of how to script in fusion, we can finally see how the ease-copy script was implemented. In the next section, we’ll go over most of the script’s final revision, tackling it functionality by functionality.
Finding adjacent keyframes
One of the very first problems that has to be solved while making such a script is “how exactly do we query the keyframes we want to save/apply a preset to?”. This is when the first, and probably most annoying limitation of the scripting API presents itself:
You cannot query selected keyframes
Because of this, a solution that works like After Effect’s Flow extension can immediately be thrown out the window.
We must find another way to query keyframes, one that is both simple and intuitive. Here is the solution that I picked:
- When applying a preset, the script will act on every input that has a pair of surrounding keyframes;
- When saving a preset, the script will find the first input that has a pair of surrounding keyframes.
We will define “surrounding keyframes” as a pair where:
- The first keyframe is less than or equal to the current time;
- The second keyframe is strictly greater than the current time;
As such:
This should query keyframes 1 and 2;

This should query keyframes 2 and 3;

This should query nothing;

Once we have obtained the keyframes of an input, we can find the CurrentTime’s adjacent keyframes with the following implementation:
function GetAdjacentKeyframes(keyframes)

  local closestLeft = nil
  local closestRight = nil

  for k,v in pairs(keyframes) do
    if k <= currentComp.CurrentTime and (closestLeft == nil or k > closestLeft) then
      closestLeft = k
    end
    if k > currentComp.CurrentTime and (closestRight == nil or k < closestRight) then
      closestRight = k
    end
  end

  if (closestLeft and closestRight) then
    return {[closestLeft] = keyframes[closestLeft], [closestRight] = keyframes[closestRight]}
  end
end
We use a loop with no break statement so that the method can deal with unordered tables (ordering is not guaranteed as the indices are not sequential, instead, each index is the frame at which the keyframe is placed). If a valid pair is found, it is then returned.
Getting an input’s keyframes
Because this script doesn’t just work with values, but also easings. Wa cannot query properties the usual way.
As seen in the Fusion Scripting Primer, for an input to have keyframes, it needs to have a BezierSpline as its value. But as it turns out, a BezierSpline is internally treated as a modifier. Because modifiers are treated like Tools in the scripting engine, it means that the BezierSpline is now a separate entity, with an output that is connected to the property’s input. So in order to get the keyframes, we have to do the following:
input = Transform1.Size
-- To get the BezierSpline, we must first get its output
splineOutput = input:GetConnectedOutput()
-- From the output, we can then get the tool
splineTool = splineOutput:GetTool()
-- And finally, we can get the keyframes
keyframes = splineTool:GetKeyFrames()

-- As a one-liner
dump(Transform1.Size:GetConnectedOutput():GetTool():GetKeyFrames())
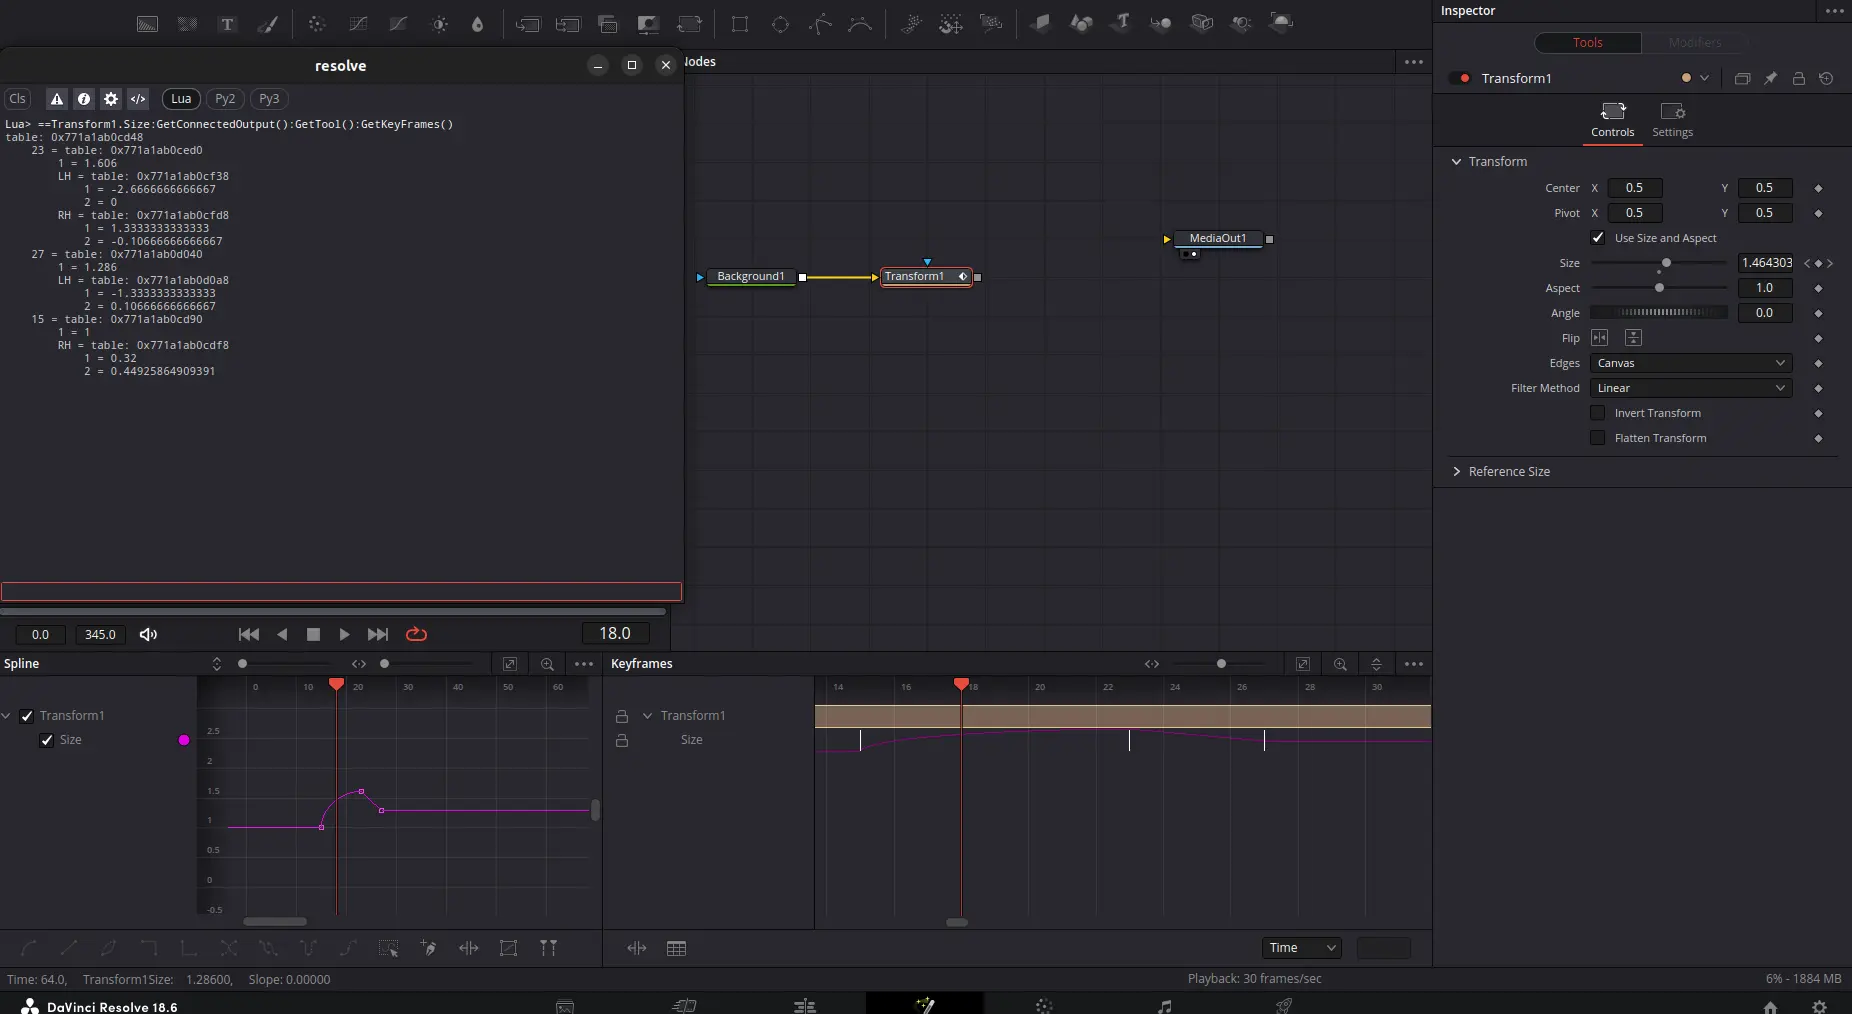
Looking at this, you can notice that, as seen in the LUA primer, the indices are arbitrarily ordered.
Because such an operation is very verbose, it can be wrapped in a helper:
function GetTool(input)
  local output = input:GetConnectedOutput()
  if (output ~= nil) then
    return output:GetTool()
  end
end
We do not call GetKeyframes in this method, as the tool itself can have other uses beyond just getting the keyframes.
Finding every eligible input when applying a preset
Let’s now imagine that we have an easing preset we want to apply, how are we to figure out which nodes/tools are selected, and which input of these nodes contain animated properties (properties that have keyframes)?
First of all, comp:GetToolList() contains an optional argument, passing comp:GetToolList(true) will make it return only the nodes that we have selected.
Then, we can iterate over those tools.
function EaseCopy(presetName, targetProp, copy)
  currentComp:StartUndo("EaseCopy")
  currentComp:Lock()
  for k,v in pairs(currentComp:GetToolList(true)) do
    local endExecutionEarly = EaseCopyTool(v, presetName, targetProp, copy)
    if (endExecutionEarly) then
      currentComp:Unlock()
      currentComp:EndUndo(true)
      return true
    end
  end
  currentComp:Unlock()
  currentComp:EndUndo(true)
end
Tip: you can lock and unlock compositions when doing automated scripting actions in order to avoid unnecessary UI updates.
Next, we need to iterate over all the properties of a tool. To that end, we use tool:GetInputList()
function EaseCopyTool(tool, presetName, targetProp, copy)
  for k,v in pairs(tool:GetInputList()) do
    local endExecutionEarly = EaseCopyInput(v, presetName, targetProp, copy)
    if (endExecutionEarly) then
      return true
    end
  end
end
Once we are iterating over inputs, we need to find one which input is eligible, as in, which input contains keyframes.
function EaseCopyInput(input, presetName, targetProp, copy)
  if not IsViableInput(input) then return end

  local inputTool = GetTool(input)

  if not inputTool then; return; end

  if (IsModifier(inputTool) and not IsBezierSpline(inputTool)) then
    return EaseCopyTool(inputTool, presetName, targetProp, copy)
  end

  if not IsTargetInput(input, targetProp) then return end

  local keyframes = inputTool:GetKeyFrames()

  if not keyframes then; return; end

  -- ...
  -- Rest omitted
  -- ...

end
This method makes use of numerous helpers to keep the code clean:
function IsViableInput(input)
  return input:GetAttrs("INPB_Connected") and input:GetAttrs("INPS_DataType") ~= "LookUpTable"
end
First, we make sure that the input is a connected input (meaning, a modifier’s output is connected to it and it is not just a plain value). We also make sure to ignore Lookup Tables (LUTs), which are also treated like a connected input, but cannot be keyframed (the CustomTool node, for example, contains LUT inputs).
Because we want easings applied to every modifier (as modifiers can sometimes also be animated), we need to recursively go over every input that is a modifier, except when the modifier is a BezierSpline (because it being a bezier spline means that it is our target to apply the ease to), for that, we use the following helpers.
function IsModifier(tool)
  local regModifiers = fusion:GetRegList(fusion.CT_Modifier)
  local toolAttrs = tool:GetAttrs()

  for _,v in pairs(regModifiers) do
    if v:GetAttrs().REGS_ID == toolAttrs.TOOLS_RegID then
      return true
    end
  end
  return false
end

function IsBezierSpline(tool)
  return tool:GetAttrs().TOOLS_RegID == "BezierSpline"
end
To know wether a tool is a modifier, wa need to make use of the fusion registry: we query every modifier type from the registry, and then check if the current tool is any of such types.
As for checking wether it’s a BezierSpline or not, this is easily done using just the tool’s attributes.
This was not mentioned in the Fusion Scripting primer, but
Attributesare the metadata of many fusion object, they use a specific syntax that includes the object’s type, the attribute type, and the attribute name: ex. REGS_ID => Registry - String - ID. Attributes are very handy for these kinds of use cases. Read more about attributes on page 39 of the scripting manual.
When the script is called with a targetInput, it means that the user only wants to save/apply a preset targeting one single property.
function IsTargetInput(input, targetProp)
  if targetProp == 'ALL' then return true end

  t = Split(targetProp, ':')

  return input:GetTool():GetAttrs().TOOLS_Name == t[1] and input:GetAttrs().INPS_ID == t[2]
end

function Split (inputstr, sep)
  if sep == nil then
     sep = "%s"
  end
  local t={}
  for str in string.gmatch(inputstr, "([^"..sep.."]+)") do
     table.insert(t, str)
  end
  return t
end
Splitting a string is not part of the LUA standard library, it needs to be implemented manually.
Once all those checks have passed, we know that our input is a valid input that has keyframes, all that remains is checking if the input has adjacent keyframes and saving/applying an ease preset.
Saving an ease
Once we have our adjacent keyframes we can save their easing curves as a new preset.
First, we need to understand how a keyframe is structured:
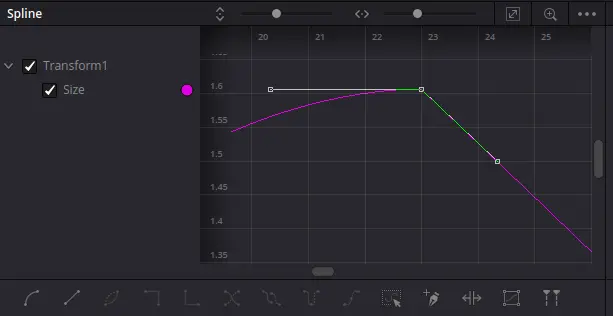
This is how the keyframe appears in the keyframe table.
==Transform1.Size:GetConnectedOutput():GetTool():GetKeyFrames()
-- table: 0x771a1ab11860
-- 	23 = table: 0x771a1ab119a8
-- 		1 = 1.606
-- 		LH = table: 0x771a1ab11a10
-- 			1 = -2.6666666666667
-- 			2 = 0
-- 		RH = table: 0x771a1ab11ab0
-- 			1 = 1.3333333333333
-- 			2 = -0.10666666666667
-- ... rest omitted
The index is the frame at which the keyframe is placed.
The keyframe itself is also a table:
- Its first property represents the keyframe value: a size of 1.6;
- The second and third parameters are the handles, each a table;
- The first value represents the X offset, in frames, compared to the keyframe;
- The second value is the Y offset compared to the keyframe too.
Because the handles are dependant on the X and Y units, we cannot simply save them as they currently are. Or the easing curves would not be copied properly:
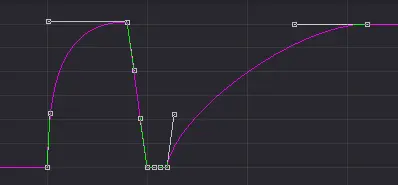
As you can see here, the handle offsets are the same for the first and second curves, but the resulting curves look wildly different.
This would be a more desirable result:
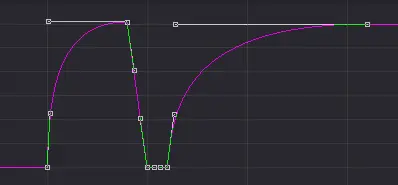
Because of that, we must normalize the keyframes before saving them:
function NormalizeKeyframePairHandles(adjacentKeyframes)
  local tLeft, hLeft, tRight, hRight = SortAdjacentFrames(adjacentKeyframes)

  local timeDiff = tRight - tLeft
  local valueDiff = hRight[1] - hLeft[1]

  if valueDiff == 0 then; return nil; end

  local RH = hLeft.RH
  local LH = hRight.LH

  return {
    RH = { RH[1] / timeDiff, RH[2] / valueDiff },
    LH = { LH[1] / timeDiff, LH[2] / valueDiff },
  }
end
This function transforms the unit-relative handle offsets to values that are normalized between -1 and 1.
Finally, to save and persist a preset, we use the SetData to save the data inside of fusion’s preferences:
function CopyEase(presetName, adjacentKeyframes)
  local normalized = NormalizeKeyframePairHandles(adjacentKeyframes)
  print("copying ease as " .. presetName)
  fusion:SetData("easeCopy.presets." .. presetName, normalized)
end
Applying an ease
To paste an easing preset, the process is the same, just in reverse, once we have our adjacent keyframes, we get the normalized handle from fusion’s preferences, before denormalizing them, patching the existing keyframes with the new ones, and replacing all keyframes with the patched result.
function PasteEase(tool, presetName, adjacentKeyframes, hardReplace)
  local ease = fusion:GetData("easeCopy.presets." .. presetName)
  if ease then
    print("pasting ease preset " .. presetName)
    local denormalized = DenormalizeKeyframePairHandles(adjacentKeyframes, ease)
    local oldKf = tool:GetKeyFrames()
    local newKf = PatchExistingKeyFrames(oldKf, denormalized)

    tool:SetKeyFrames(newKf, false)
  end
end

function DenormalizeKeyframePairHandles(adjacentKeyframes, normalized)
  local tLeft, hLeft, tRight, hRight = SortAdjacentFrames(adjacentKeyframes)

  local timeDiff = tRight - tLeft
  local valueDiff = hRight[1] - hLeft[1]

  local RH = normalized.RH
  local LH = normalized.LH

  adjacentKeyframes[tLeft].RH = { RH[1] * timeDiff, RH[2] * valueDiff }
  adjacentKeyframes[tRight].LH = { LH[1] * timeDiff, LH[2] * valueDiff }
  adjacentKeyframes[tLeft].Flags = { RH[1] * timeDiff, RH[2] * valueDiff }
  adjacentKeyframes[tRight].Flags = { LH[1] * timeDiff, LH[2] * valueDiff }

  return adjacentKeyframes
end

function PatchExistingKeyFrames(keyframes, denormalized)
  local k1, v1 = next(denormalized)
  local k2, v2 = next(denormalized, k1)

  keyframes[k1] = v1
  keyframes[k2] = v2

  return keyframes
end
Fusion’s UI Manager
The script window looks like this:
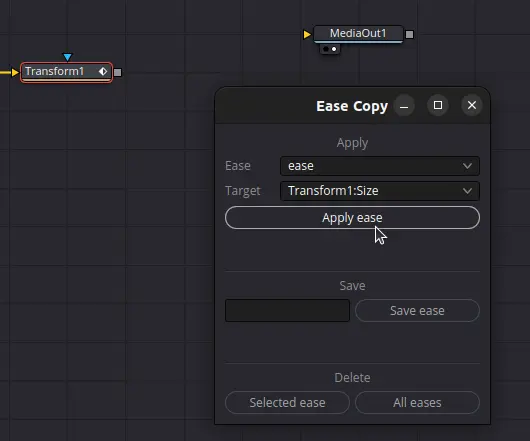
Depending on the selected node, different target properties are available for applying and saving eases. Setting the parameter to “ALL” applies to every eligible keyframed property.
The UIManager is an utility class that is used to create parametrized user interfaces for scripts.
Because it is based on QT, the scripting documentation contains no information on it, but the following links provide a decent introduction to its functionalities:
- A quick article by Yanru Mu
- A thread on the weSuckLess forum, containing a multitude of usage examples
- The official QT Documentation
The AddWindow method is only used to define all the UI components making up the script window:
local ui = fu.UIManager
local disp = bmd.UIDispatcher(ui)
local width,height = 275,300
local positionX,positionY = 800,400
local currentComp = fu:GetCurrentComp()

win = disp:AddWindow({
	ID = 'MyWin',
	TargetID = 'MyWin',
	WindowTitle = 'Ease Copy',
  Geometry = {positionX, positionY, width, height},
	Spacing = 0,
  ui:VGroup{
    ID = 'root',
    ui:Label{
      Weight = 0,
      Text = 'Apply',
      Alignment = {AlignHCenter = true},
    },
    ui:HGroup{
      Weight = 0,
      ui:Label    { Weight = 0.5, Text = 'Ease', },
      ui:ComboBox { Weight = 2, ID = 'qEase', Text = '', },
    },
    ui:HGroup{
      Weight = 0,
      ui:Label    { Weight = 0.5, Text = 'Target', },
      ui:ComboBox { Weight = 2, ID = 'qTargetProp', Text = '', },
    },
    ui:Button { Weight=0, ID = 'qApplyBtn', Text = 'Apply ease' },
    -- 30 extra lines omitted
  }
})
After initializing the UIManager and defining parameters like window size and position, widgets are created and placed in the flow, the ID properties of each widget are used for event binding.
The following events are implemented:
-- EVENT BINDING --

notify = ui:AddNotify('Comp_Activate_Tool')

function win.On.MyWin.Close(ev)
	disp:ExitLoop()
end

function disp.On.Comp_Activate_Tool(ev)
  ReloadTargetComboBox()
end

function win.On.qApplyBtn.Clicked(ev)
  local presetName = itm.qEase.CurrentText
  local targetProp = itm.qTargetProp.CurrentText

  if (presetName ~= '') then
    EaseCopy(presetName, targetProp)
  end
end

function win.On.qSaveBtn.Clicked(ev)
  local presetName = itm.qSaveEaseText.Text
  local targetProp = itm.qTargetProp.CurrentText

  if (presetName ~= '') then
    if EaseCopy(presetName, targetProp, true) then
      itm.qSaveEaseText.Text = ''
      ReloadEaseComboBox(presetName)
    end
  end
end

function win.On.qDeleteOne.Clicked(ev)
  local presetName = itm.qEase.CurrentText
  fusion:SetData("easeCopy.presets." .. presetName, nil)
  ReloadEaseComboBox()
  print('Ease: ' .. presetName .. ' deleted.')
end

function win.On.qDeleteAll.Clicked(ev)
  local confirmClear = currentComp:AskUser("Delete all eases?", {})
  if not confirmClear then return end
  fusion:SetData("easeCopy", nil)
  ReloadEaseComboBox()
  print('All eases have been deleted.')
end
With this, all the interactivity of the UI is done, we also added a special event Comp_Activate_Tool, so that, every time the user clicks on a new node, the list of available target properties is updated.
Finally, we need functions that populate dynamic dropdown menus (the menus for selecting an ease preset, and the menu for selecting eligible inputs):
function ReloadEaseComboBox(newSelected)
  dump('reloading')
  local savedEases = fusion:GetData("easeCopy.presets")
  local presets = {}


  if savedEases then;
    presets = GetKeys(fusion:GetData("easeCopy.presets"));
  end

  itm.qEase:Clear()
  for _, preset in pairs(presets) do
    itm.qEase:AddItem(preset)
  end

  if newSelected ~= '' then
    itm.qEase:SetCurrentText(newSelected)
  end

end

function ReloadTargetComboBox()
  currentComp = fu:GetCurrentComp()

  itm.qTargetProp:Clear()
  itm.qTargetProp:AddItem('ALL')
  for _, target in pairs(FindEligibleInputs(currentComp:GetToolList(true))) do
    itm.qTargetProp:AddItem(target)
  end
end
With this, the script is ready and working.
Bugs that were fixed after release
Once I uploaded this script, I got notified of a few bugs that I failed to notice in testing due to differences in workflows.
The first bug that I was notified of was an issue where the script would break for no apparent reason, after a bit of troubleshooting, I realized that some people named their presets with just numbers, which broke some internal logic, the fix itself was easy enough:

The second bug was found by people who switch compositions often, each time they did, they needed to close and reopen the script for it to work. This was caused by the script using comp to access the current composition, but this value is only set when the script first launches. In order to fixed that, I used another variable called currentComp, which I updated based on fusion:GetCurrentComp(), which always stays accurate.
Bugs that could not be fixed
Some bugs I encountered while doing this script were actually bugs in the scripting API. I was only able to reduce their effect. One such bug was when applying keyframes on two-dimensional properties:
The PasteEase implementation shown earlier in this article looked like this:
function PasteEase(tool, presetName, adjacentKeyframes, hardReplace)
  local ease = fusion:GetData("easeCopy.presets." .. presetName)
  if ease then
    print("pasting ease preset " .. presetName)
    local denormalized = DenormalizeKeyframePairHandles(adjacentKeyframes, ease)
    local oldKf = tool:GetKeyFrames()
    local newKf = PatchExistingKeyFrames(oldKf, denormalized)

    tool:SetKeyFrames(newKf, false)
  end
end
This was a simplified version for the sake of demonstration, the actual implementation looks like this:
function PasteEase(tool, presetName, adjacentKeyframes, hardReplace)
  local ease = fusion:GetData("easeCopy.presets." .. presetName)
  if ease then
    print("pasting ease preset " .. presetName)
    local denormalized = DenormalizeKeyframePairHandles(adjacentKeyframes, ease)
    local oldKf = tool:GetKeyFrames()
    local newKf = PatchExistingKeyFrames(oldKf, denormalized)

    if hardReplace then
      tool:DeleteKeyFrames(currentComp:GetAttrs().COMPN_GlobalStart, currentComp:GetAttrs().COMPN_GlobalEnd)
      tool:SetKeyFrames(newKf, false)
    else
      ShowDisplacementWarning()
      tool:SetKeyFrames(newKf, false)
      -- This is not a mistake, for some reason, running this twice on Displacement properties
      -- gives better (though still inconsistent) results
      tool:SetKeyFrames(newKf, false)
    end
  end
end
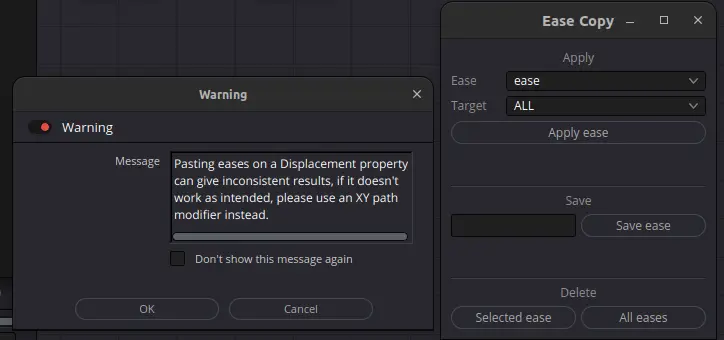
An additional precaution that was taken was to show the user a warning when such a situation was encountered:
Conclusion
That was a very long-winded article, but by now, you hopefully have a good-enough idea of how to script in Fusion, where to learn more about it, and the kind of problems you are likely to encounter in it.
Scripting is not a silver bullet to all of Fusion’s problems, but taken far enough, it is still able to make fusion into a much nicer tool to use.
(Fun fact, by the time this script was finished, I had already finished my last video with Fusion, I later switched to Autograph, meaning I did not even get to use my own script in any of my projects).
Thank you very much for reading this far, see you in another article!